
Building a File Explorer in Vue 3
Build a User-Friendly File Manager Using Vue 3
By Calson Chiatiah
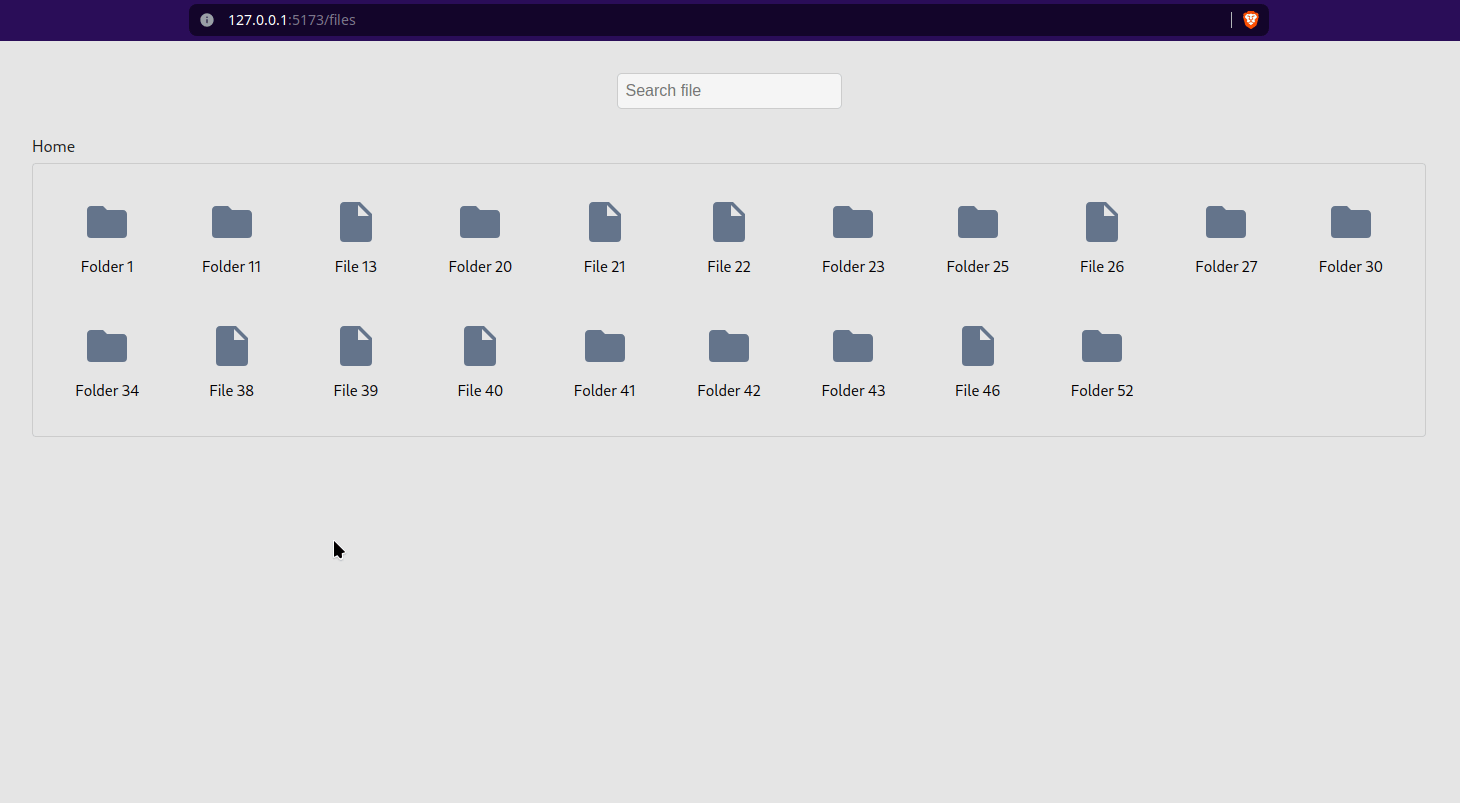
In the previous article Using Recursive Queries to explore a file system structure stored in PostgreSQL we looked at how a file system representation could be stored and queried from a database. In this article we will implement a file explorer in VueJS that can display this file system representation. Navigation in this file explorer should work similar to how popular services such as Google Drive, Dropbox, etc work. By the end of this article we should build a file explorer that looks like this.
The complete working code for this article can be found on Github https://github.com/n05la3/building-a-file-explorer.
Implementation
Throughout this article we assume that the implementation is done in a new Vue 3 project (v3.4.21). So watch out for any boilerplate code differences between this implementation and your setup at the time you read this article. We also assume basic understanding of VueJS concepts, so we won’t be explaining certain Vue specific details.
We start off by implementing a function that generates a list of files in /src/files.ts. Typically, the data generated here should be coming from your server. To keep things simple, we will mock the data in a function generateFiles(). The code has been folded, you can open to view its full content.
Click to see the code
export interface FileOrDirectory {
  id: number;
  name: string;
  isDirectory: boolean;
  parentDirectoryId: number | undefined;
}

function generateFile(
  id: number,
  parentId?: number,
  directory?: boolean
): FileOrDirectory {
  const isDirectory = directory ?? Math.random() > 0.5; // Randomly choose file or directory
  const name = isDirectory ? `Folder ${id}` : `File ${id}`;

  return {
    id,
    name,
    isDirectory,
    parentDirectoryId: parentId,
  };
}

export function generateFiles(totalNumberOfFiles: number): FileOrDirectory[] {
  const files: FileOrDirectory[] = [];

  // Let's start off by generating a directory
  const directory = generateFile(1, undefined, true);
  files.push(directory);

  const directoriesGenerated: FileOrDirectory[] = [directory];
  let rootFileCount = 1;

  // Generate remaining files with some nesting
  for (let i = 2; i < totalNumberOfFiles; i++) {
    // If there are too many files at the root, let's ensure new files are placed in an existing directory
    const hasTooManyRootFiles = rootFileCount >= totalNumberOfFiles / 5;
    const pickFileFrom = hasTooManyRootFiles ? directoriesGenerated : files;

    const potentialParent = pickFileFrom.at(
      Math.floor(Math.random() * pickFileFrom.length)
    );
    const file = generateFile(
      i,
      potentialParent?.isDirectory ? potentialParent.id : undefined
    );

    if (!file.parentDirectoryId) {
      rootFileCount += 1;
    }
    if (file.isDirectory) {
      directoriesGenerated.push(file);
    }

    files.push(file);
  }

  return files;
}
A file as represented here can be a simple file or a directory.
The isDirectory flag differentiates directories from files.
The parentDirectoryId prop on a file marks the directory in which this file is located. When it is undefined, then the file is found at the root of the file system.
The files are generated such that there are not too many files at the root (See comment in the loop of generateFile()) The list of files generated will look something like this:
[{id: 1, name: ‘File 1’, parentDirectoryId: undefined, isDirectory: false}, ...]
Note that it does not contain the file path or any extra information about the file. This is because we want to keep it simple and lean. Typically, it could also contain a file path, usually an S3-like key to the actual file.
Now that we have a list of files ready to be displayed, create a file at src/components/file-item.vue which displays a file.
<template>
  <div class="file-item-container">
    <svg
      role="presentation"
      viewBox="0 0 24 24"
      :style="{ height: size, width: size }"
    >
      <title>{{ name }}</title>
      <path
        v-if="isDirectory"
        d="M10,4H4C2.89,4 2,4.89 2,6V18A2,2 0 0,0 4,20H20A2,2 0 0,0 22,18V8C22,6.89 21.1,6 20,6H12L10,4Z"
        style="fill: #64748b"
      ></path>

      <path
        v-else
        d="M13,9V3.5L18.5,9M6,2C4.89,2 4,2.89 4,4V20A2,2 0 0,0 6,22H18A2,2 0 0,0 20,20V8L14,2H6Z"
        style="fill: #64748b"
      ></path>
    </svg>
    <div class="item-label">{{ name }}</div>
  </div>
</template>
Click to reveal the style section
<style scoped lang="scss">
  .file-item-container {
    display: flex;
    flex-direction: column;
    justify-content: center;
    align-items: center;
    gap: 8px;
    padding: 4px;
    transition: color, background-color 0.2s ease-in-out;
    overflow: hidden;

    &:hover {
      background-color: rgba(100, 116, 139, 0.4);
      border-radius: 4px;
      color: white;
    }

    .item-label {
      max-width: 100%;
      overflow: hidden;
      white-space: nowrap;
      text-overflow: ellipsis;
    }
  }
</style>
It is responsible for displaying the basic information of a file including its icon and name. The icon depends on whether the file is a directory or a simple file. The svg icons here are material icons taken from https://pictogrammers.com/library/mdi/
Next, let’s create the file src/views/file-explorer.vue and make sure it works by updating src/router/index.ts to the following:
import { createRouter, createWebHistory } from 'vue-router';

const router = createRouter({
  history: createWebHistory(import.meta.env.BASE_URL),
  routes: [
    {
      path: '/',
      // we want to redirect to the explorer if the user navigates to the root
      redirect: { name: 'home' },
      children: [
        {
          path: 'files/:id?',
          name: 'home',
          props: true,
          component: () => import('../views/file-explorer.vue'),
        },
      ],
    },
  ],
});

export default router;
In the path definition /files/:id? for the home route, the file-explorer.vue component accepts an optional id prop. This prop represents the id of the current directory being displayed. When it is undefined, then the root directory is being displayed.
Let’s build the actual explorer. The logic for the file explorer is implemented in the src/views/file-explorer.vue component. So let’s go ahead and implement it.
The feel of being an Explorer, the template
The template starts off by displaying a search field for filtering and a breadcrumb for navigating the file system. It then displays the list of files and directories in the current directory or a text to indicate that there are no files in the current directory.
<template>
  <div class="main-container">
    <div class="search-container">
      <input
        v-model="filter"
        type="text"
        class="search-field"
        placeholder="Search file"
      />
    </div>
    <div>
      <div class="breadcrumb">
        <router-link :to="{ name: 'home' }"> Home </router-link>
        <span v-if="currentDirectory.pathToRoot.length > 0"> / </span>
        <template
          v-for="(file, index) in currentDirectory.pathToRoot"
          :key="file.id"
        >
          <router-link
            :to="{ name: 'home', params: { id: file.id } }"
            class="link"
          >
            {{ file.name }}
          </router-link>
          <span v-if="index !== currentDirectory.pathToRoot.length - 1">
            /
          </span>
        </template>
      </div>
      <div v-if="filteredFiles.length === 0" class="no-files outline-container">
        No files in this directory
      </div>
      <div v-else class="grid-container outline-container">
        <!-- @dragover.prevent is needed to register the @drop event -->
        <file-item
          v-for="file in filteredFiles"
          :key="file.id"
          :is-directory="file.isDirectory"
          :name="file.name"
          draggable="true"
          @dragover.prevent
          @dragstart="handleDragStart($event, file)"
          @drop="file.isDirectory ? handleDrop($event, file) : undefined"
          @click="handleFileClick(file)"
        />
      </div>
    </div>
  </div>
</template>
The home button in the breadcrumb links to the root directory while the other breadcrumb items will take the user to the respective directories.
We will see how the variables used in the template and the event handlers are implemented as we move forward. For now, take a look at the image at the start again to see the template in action.
The beauty of Exploration, the style
Add the following style to file-explorer.vue.
Click to reveal code
<style scoped>
.main-container {
  display: flex;
  flex-direction: column;
  justify-content: center;
  align-items: center;
}
.grid-container {
  display: grid;
  grid-auto-rows: 100px;
  grid-template-columns: repeat(auto-fill, minmax(100px, 1fr));
  gap: 24px;
  justify-content: start;
  padding: 10px;
}
.outline-container {
  width: 70vw;
  border: 1px solid #ccc;
  border-radius: 4px;
  padding: 24px;
}

.no-files {
  font-size: 20px;
  text-align: center;
}

.breadcrumb {
  display: flex;
  gap: 4px;
  width: 70vw;
  font-size: 16px;
  color: rgba(0, 0, 0, 0.7);
  margin-top: 24px;
  margin-bottom: 4px;
  align-self: start;
}

.breadcrumb a {
  color: rgba(0, 0, 0, 0.7);
  text-decoration: none;
}
.router-link-exact-active {
  color: rgba(0, 0, 0, 0.87) !important;
}

.search-container {
  display: flex;
  width: fit-content;
  border: 1px solid #ccc;
  border-radius: 5px;
  margin-top: 24px;
}
.search-field {
  padding: 8px;
  font-size: 16px;
  border: none;
  outline: none;
  width: 100%;
  background-color: rgba(255, 255, 255, 0.6);
  color: rgba(0, 0, 0, 0.7);
  border-radius: 4px;
}
</style>
It displays the files in a grid inside a bordered container. Take a look at the image at the start of the article to have a better idea of how the styles translate to the final result.
The Gem of Exploration, the script
The script holds the logic for the file explorer. So let’s break it down and look at each part.
Opening a Folder by Clicking on it
We registered a handler for the click event on the file-item component. Here is its implementation.
const router = useRouter();
function handleFileClick(file: FileOrDirectory) {
  if (!file.isDirectory) {
    console.error('File opening is not implemented yet');
    return;
  }

  router.push({ name: 'home', params: { id: file.id } });
}
It navigates into the specific directory by opening the home route with the id of the directory as a parameter (See src/routes/index.ts). We will look at the logic for actually displaying the files in the directory clicked shortly.
Moving a File
function handleDragStart(event: DragEvent, file: unknown) {
  // eslint-disable-next-line @typescript-eslint/no-non-null-assertion
  event.dataTransfer!.setData('moved-item', JSON.stringify(file));
}

function moveFile(draggedItemId: number, newFolderId: number) {
  files.value = files.value.map((file) =>
    file.id === draggedItemId
      ? {
          ...file,
          parentDirectoryId: newFolderId,
        }
      : file
  );
}

function handleDrop(event: DragEvent, file: FileOrDirectory) {
  const draggedItemData = event.dataTransfer?.getData('moved-item');
  if (!draggedItemData) {
    return;
  }
  const draggedItem = JSON.parse(draggedItemData) as FileOrDirectory;

  const isDroppingToSameFolder = file.id === draggedItem.id;
  if (isDroppingToSameFolder || !file.isDirectory) {
    return;
  }
  moveFile(draggedItem.id, file.id);
}
We registered the events (dragstart, dragover and drop ) for moving files on file-item. For this to work, we need to set draggable="true". dragover event is needed to ensure the drop event is fired.
When the drag starts, we set the file being moved on the dataTransfer object and when the drop event is fired, we move this file to the directory on which the drop event was fired by changing the parentDirectoryId of the file.
Constructing the file system structure and filtering
const props = defineProps<{
  id?: string;
}>();

const filter = ref('');
const files = ref(generateFiles(100));

const currentDirectoryId = computed(() =>
  props.id ? Number(props.id) : undefined
);
const { itemsAtDirectory: currentDirectory, isInDirectory } =
  useFileOrDirectoryStructure(files, currentDirectoryId);

const filteredFiles = computed(() =>
  currentDirectory.value.files.filter((file) =>
    file.isDirectory
      ? isInDirectory(file.id, filter.value)
      : file.name.toLowerCase().includes(filter.value.toLowerCase())
  )
);
The component accepts a prop id representing the id of the current directory being displayed. A list of 100 files is generated and this is passed to the useFileOrDirectoryStructure composable to construct the file system structure. The actual files displayed are from the filteredFiles computed property. It filters the files based on the filter input field which we defined in the template. isInDirectory ensures that during filtering, if a file is nested in a directory and is being searched for, then the directory is also included in the search results.
Even though clicking on a file changes the route, the files are generated only once because they are all rendered in the same component which does not get re-rendered when the route changes, i.e. when the route param id changes.
We have made the current directory a computed function so that the directory structure will be reconstructed when the current directory changes, thereby displaying the correct files in the current directory.
The useFileOrDirectoryStructure composable
The file src/composables/file-or-directory.ts is responsible for constructing the file system structure. Before we define the composable, let’s create a method which enables it to build the file system structure.
export type Directory = FileOrDirectory & { children?: FileOrDirectory[] };
type FlatDirectory = Map<number, Directory>;

function buildFileStructure(files: FileOrDirectory[]) {
  const flatDirectory: FlatDirectory = new Map();
  const rootDirectory: FileOrDirectory[] = [];

  for (const file of files) {
    if (file.isDirectory) {
      flatDirectory.set(file.id, {
        ...file,
        children: files.filter(
          ({ parentDirectoryId }) => parentDirectoryId === file.id
        ),
      });
    }

    if (!file.parentDirectoryId) {
      rootDirectory.push(file);
    }
  }

  return {
    flatDirectory,
    rootDirectory,
  };
}
This function builds a flat folder structure. This structure is a map whose keys are the file ids and values are the respective directories together with the files in the directory defined as children. It also returns all the files at the root.
Now that we have this structure in place, given a file id, we can easily get all the files in it from the Map. If this id is undefined, then we can return all the files at the root. This is what the useFileOrDirectoryStructure composable does.
The computed property itemsAtDirectory picks up the files in a directory with the help of the directory structure built by the buildFileStructure function.
function buildPathToRoot(
  flatDirectory: FlatDirectory,
  directoryId: number,
  paths: Directory[]
) {
  const directory = flatDirectory.get(directoryId);
  if (directory) {
    paths.push(directory);
  }

  if (directory?.parentDirectoryId) {
    buildPathToRoot(flatDirectory, directory.parentDirectoryId, paths);
  }

  return paths;
}

export function useFileOrDirectoryStructure(
  files: Ref<FileOrDirectory[]>,
  currentDirectoryId: ComputedRef<number | undefined>
) {
  const directoryStructure = computed(() => buildFileStructure(files.value));
  const currentDirectoryPathToRoot: Record<string, Directory[] | undefined> =
    {};

  function isInDirectory(directoryId: number, filename?: string): boolean {
    if (!filename) {
      return true;
    }

    const needle = filename?.toLowerCase();
    if (!directoryStructure.value.flatDirectory.get(directoryId)) {
      return false;
    }

    const directory = directoryStructure.value.flatDirectory.get(directoryId);
    if (needle && directory?.name.toLowerCase().includes(needle)) {
      return true;
    }

    if (!directory?.children) {
      return false;
    }

    if (needle) {
      const matchFoundInChildren = directory.children.some(
        (file) => !needle || file.name.toLowerCase().includes(needle)
      );
      if (matchFoundInChildren) {
        return true;
      }
    }

    const directoriesInChildren = directory.children.filter(
      ({ isDirectory }) => isDirectory
    );

    for (const directory of directoriesInChildren) {
      if (isInDirectory(directory.id, needle)) {
        return true;
      }
    }

    return false;
  }

  return {
    itemsAtDirectory: readonly(
      computed(() => {
        let directoryHierarchy: Directory[] = [];
        let currentDirectory: Directory | undefined = undefined;

        if (!currentDirectoryId.value) {
          return {
            files: directoryStructure.value.rootDirectory,
            pathToRoot: directoryHierarchy,
          };
        }
        if (
          !directoryStructure.value.flatDirectory.get(currentDirectoryId.value)
        ) {
          return {
            files: [],
            pathToRoot: directoryHierarchy,
          };
        }

        // Builds the path structure in the form of an array containing all the directories.
        // It only builds this structure if the directory is visited and saves it so that when
        // the path is visited and the saved version is used instead.
        const path = currentDirectoryPathToRoot[currentDirectoryId.value];
        if (path) {
          directoryHierarchy = path;
        } else {
          directoryHierarchy = buildPathToRoot(
            directoryStructure.value.flatDirectory,
            currentDirectoryId.value,
            []
          );
          currentDirectoryPathToRoot[currentDirectoryId.value] =
            directoryHierarchy;
        }

        currentDirectory = directoryStructure.value.flatDirectory.get(
          currentDirectoryId.value
        );

        return {
          files: currentDirectory?.children ?? [],
          pathToRoot: directoryHierarchy.slice().reverse(),
        };
      })
    ),
    isInDirectory,
  };
}
Because the files from which the construction is done and the currentDirectoryId are reactive, it means that every time they change the itemsAtDirectory is recomputed. Hence, if the user clicks on a file, the currentDirectoryId changes, and this triggers the recomputation of the itemsAtDirectory. This then leads to the files at the current directory being displayed.
The itemsAtDirectory returns both the files at the current directory and the path from the current directory to the root directory. The path to the root is built recursively using the buildPathToRoot function. It is this path from the current directory to root that is used to build the breadcrumb.
The composable also exposes a method isInDirectory which as described earlier, is used to correctly filter directories. Even if the directory does not match the filter, it is still included if a file within it matches the filter.
Conclusion
Okay, that was a lot of code all over the place. The code is all organised in this repo https://github.com/n05la3/building-a-file-explorer, you can clone and test it out. If you got this working and you are looking to improve the file upload experience for your users, checkout my other articles on Reading and organising files and folders dropped on a web page from the file system and on Building a Simple Parallel and Controlled Task Runner in JavaScript.
Ready to build the apps your users will love and enjoy using? Dreamonkey has experts to bring your dream app to live. If you need any help with this tutorial or if you would like to request a development consultancy you can Contact us or you can check our Github Sponsorship page directly.